| Description | HowTos for HPC cluster itrop |
|---|---|
| Related-course materials | HPC |
| Authors | Ndomassi TANDO (ndomassi.tando@ird.fr) |
| Creation Date | 11/06/2018 |
| Last Modified Date | 28/01/20 |
Summary
- Preambule: Architecture of the Itrop Cluster and Softwares to install before connecting to the cluster
- How to: Transfer files with filezilla
sftpon the Itrop cluster - How to: Connect to the Itrop cluster via
ssh - How to: Reserve one or several cores of a node
- How to: Transfer my data from the nas servers to the node
- How to: Use the Module Environment
- How to: Launch a job with Slurm
- How to: Choose a particular partition
- How to: Ask for a software, an account or a project space
- How to: See or delete your data on the /scratch partition of the nodes
- How to: Use a singularity container
- How to: Cite the Itrop platform in your publications
- Links
- License
Preambule
Architecture of the Itrop cluster:
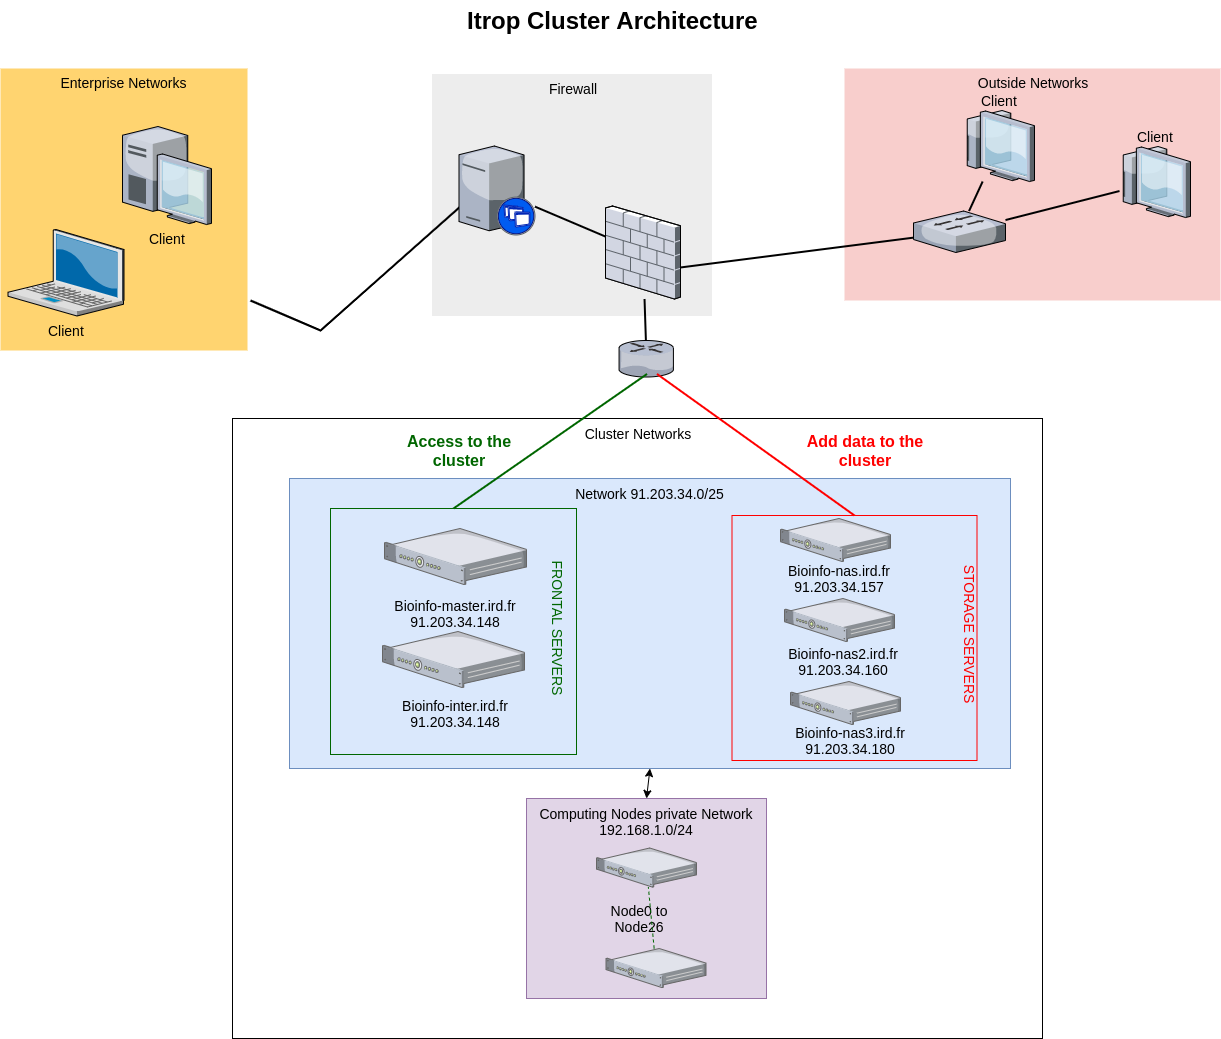
The IRD Bioinformatic Cluster is composed of a pool of machines reachable through a single entry point. The connections to the internal machines are managed by a master node that tries to ensure that proper balancing is made across the available nodes at a given moment: bioinfo-master.ird.fr
The cluster is composed of:
- 1 master
- 3 nas servers for a 127To data storage
- 27 nodes servers : 8 nodes with 12 cores, 2 nodes with 16 cores, 4 nodes with 20 cores, 11 with 24 cores, 1 with 40 cores with RAM from 48Go to 1To and a GPU serveur with 8 RTX 2080 graphical cards.
Here is the architecture:

Getting connected to a Linux server from Windows with SSH (Secure Shell) protocol
| Platform | Software | Description | url |
|---|---|---|---|
 |
mobaXterm | an enhanced terminal for Windows with an X11 server and a tabbed SSH client | more |
 |
putty | Putty allows to connect to a Linux server from a Windows workstation. | Download |
Transferring and copying files from your computer to a Linux servers with SFTP (SSH File Transfer Protocol) protocol
| Platform | Software | Description | url |
|---|---|---|---|
   |
 filezilla filezilla |
FTP and SFTP client | Download |
Viewing and editing files on your computer before transferring on the linux server or directly on the distant server
| Type | Software | url |
|---|---|---|
| Distant, console mode | nano | Tutorial |
| Distant, console mode | vi | Tutorial |
| Distant, graphic mode | komodo edit | Download |
| Linux & windows based editor | Notepad++ | Download |
How to : Transfer files with filezilla sftp on the Itrop cluster
Download and install FileZilla
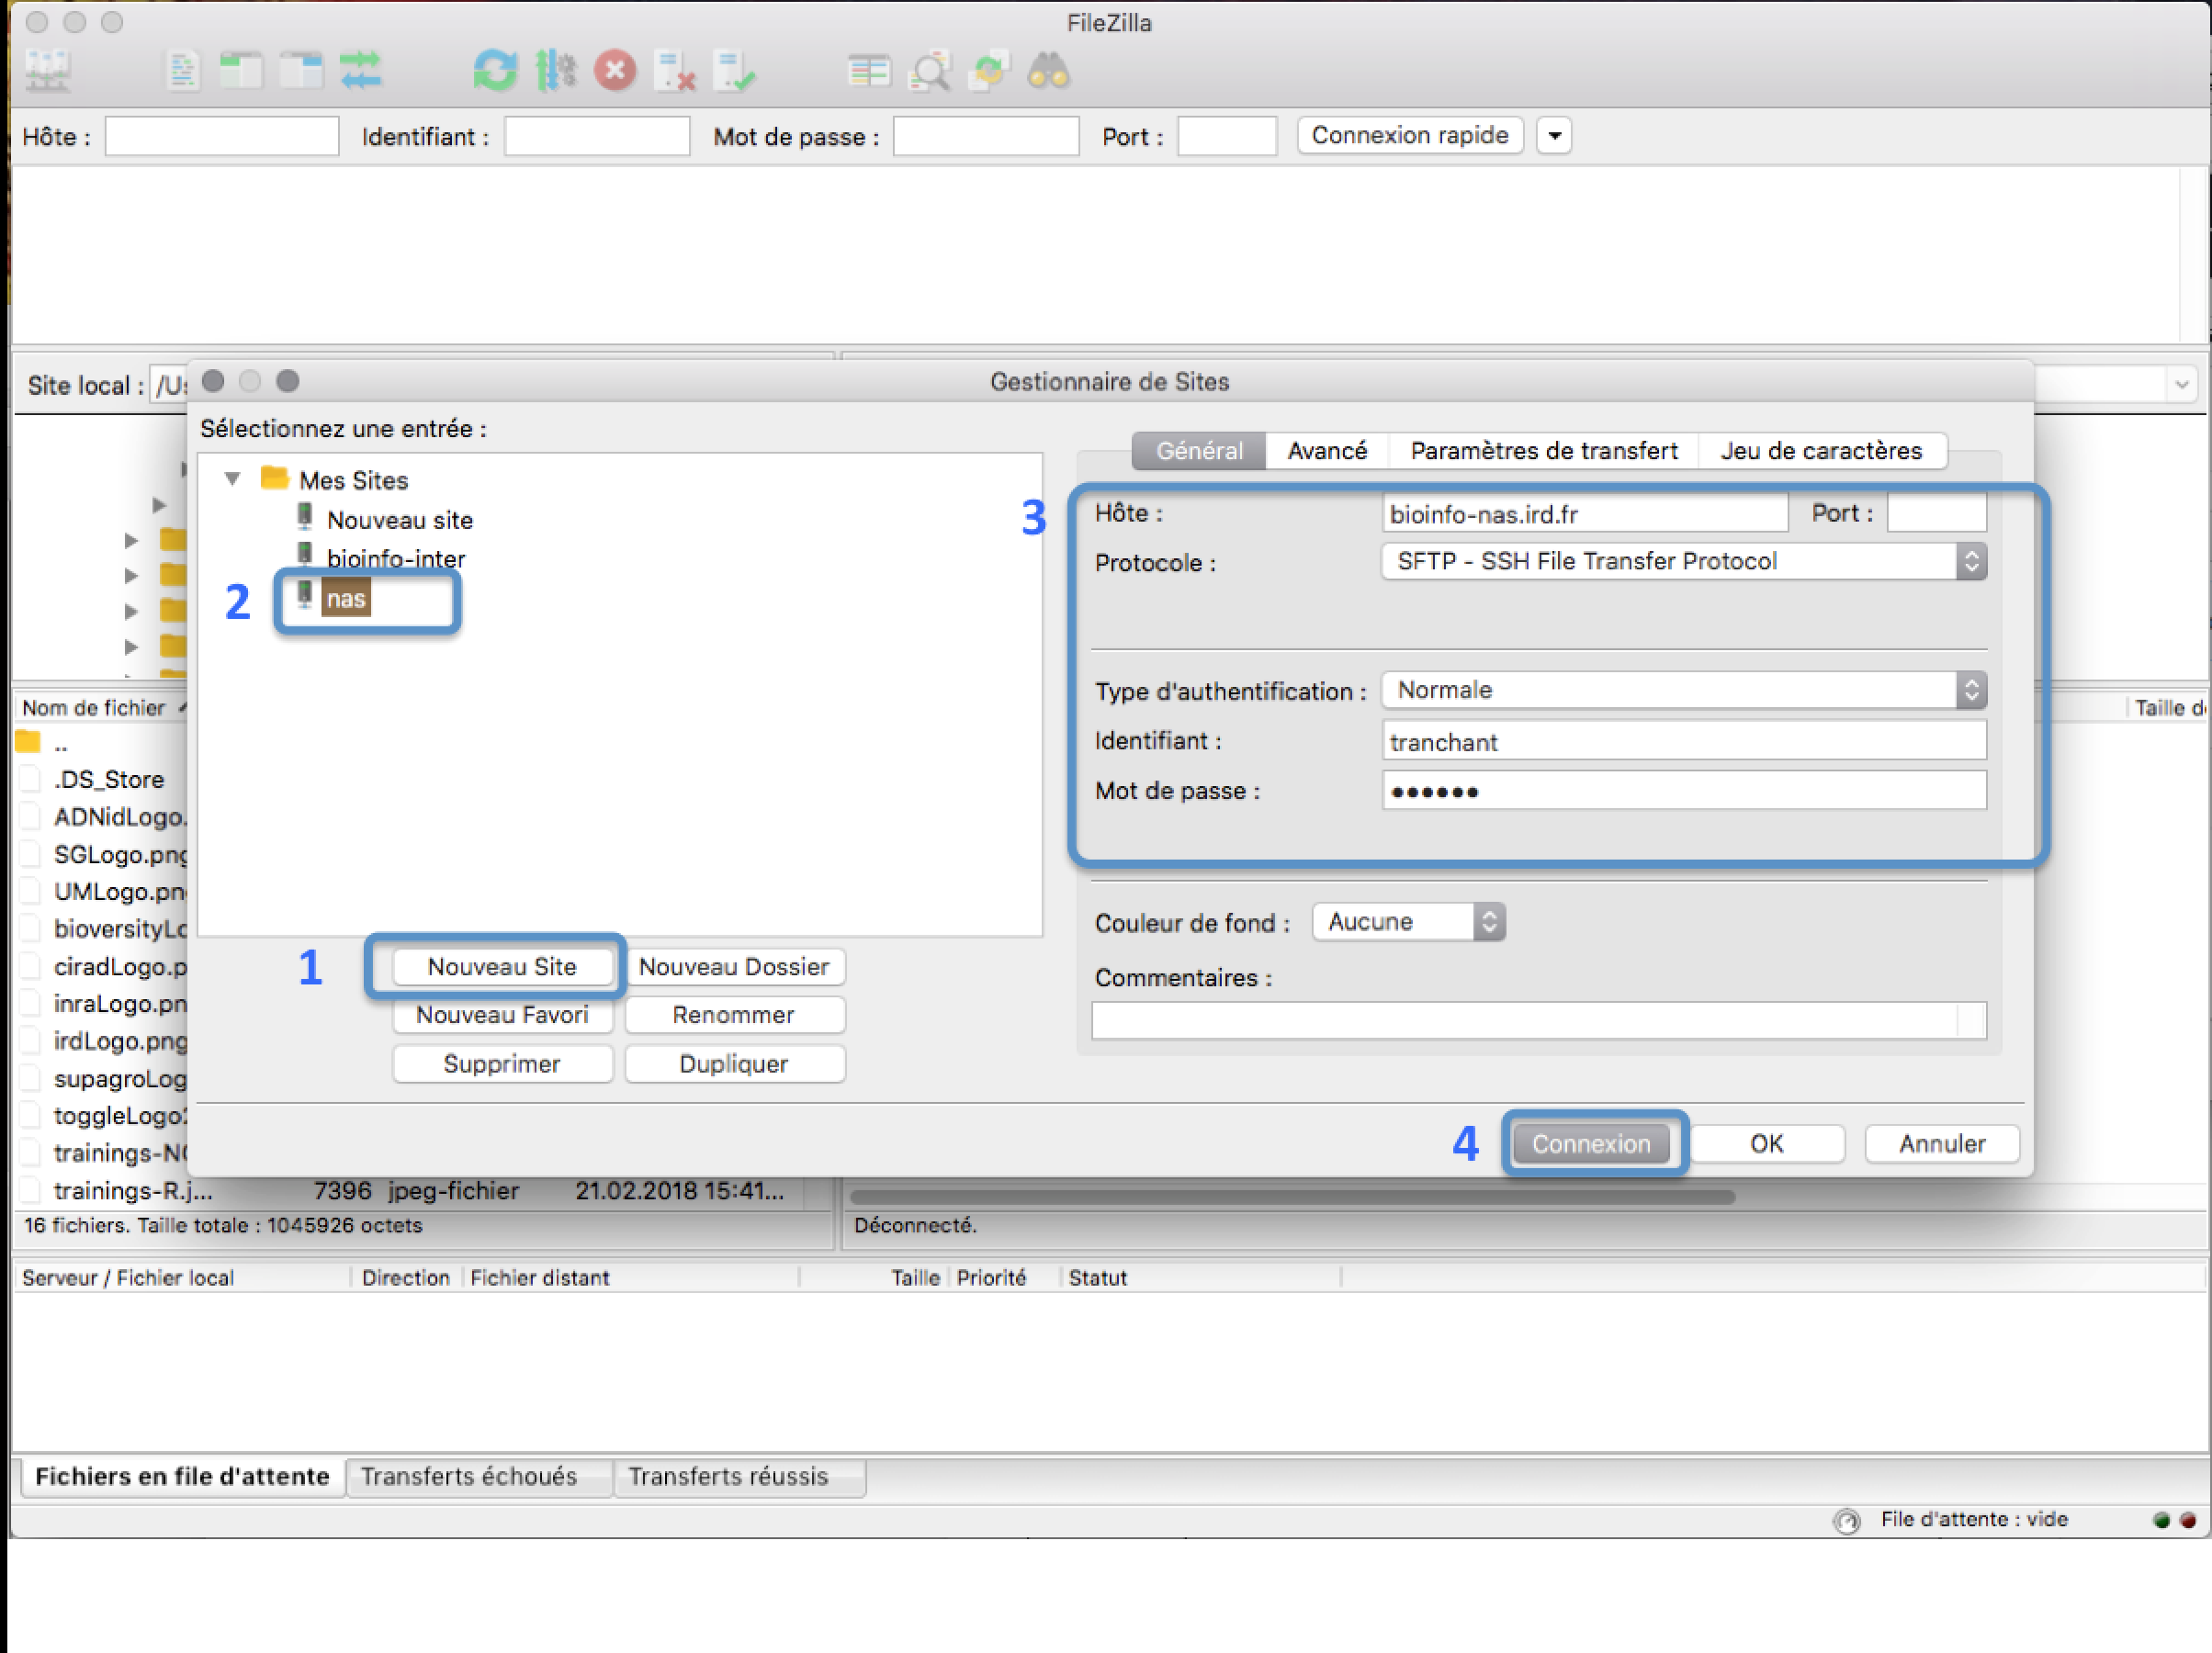
Open FileZilla and save the IRD cluster into the site manager

In the FileZilla menu, go to File > Site Manager. Then go through these 5 steps:
- Click New Site.
- Add a custom name for this site.
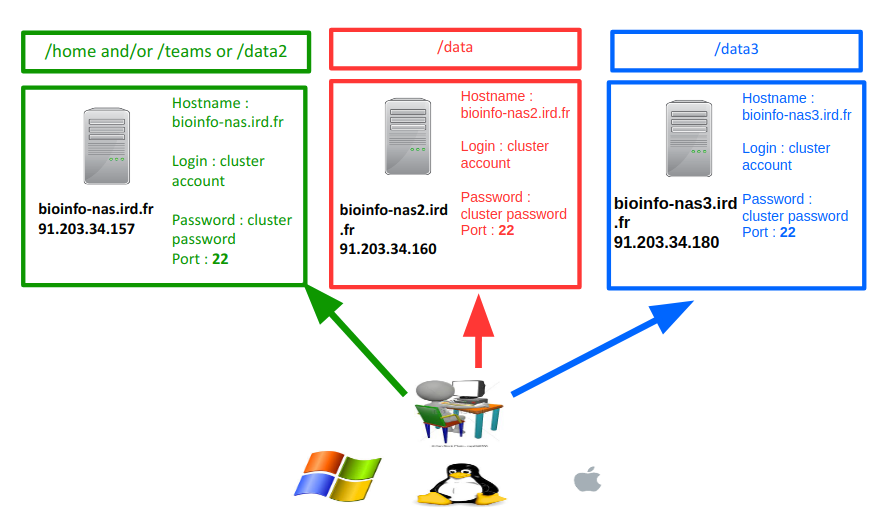
- You have 3 possible choices:
- bioinfo-nas2.ird.fr (nas2) to transfer to /data/project
- bioinfo-nas.ird.fr (nas) to transfer to /home/user, /data2/projects or /teams
- bioinfo-nas3.ird.fr (nas3)to transfer to /data3/project

- Set the Logon Type to “Normal” and insert your username and password used to connect on the IRD cluster
- Choose port 22 and press the “Connect” button.
Transferring files

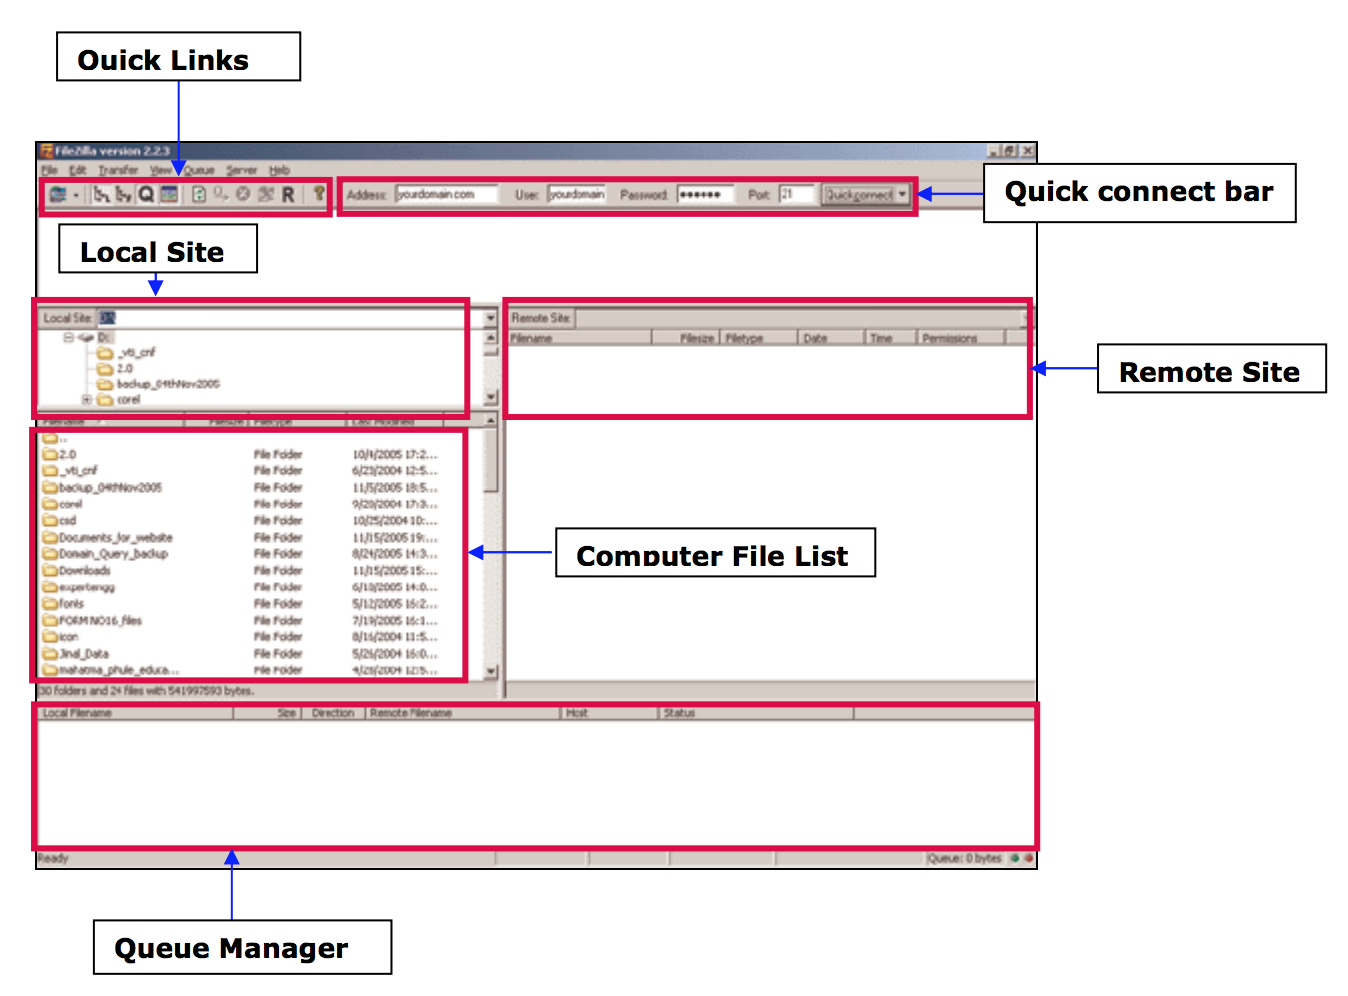
- From your computer to the cluster : click and drag an text file item from the left local colum to the right remote column
- From the cluster to your computer : click and drag an text file item from he right remote column to the left local column
How to : Connect to the cluster via ssh
First connection:
Your password has to be changed at your first connection.
“Mot de passe UNIX (actuel)”: you are asked to type the password provided in the account creation email.
Then type your new password twice.
The session will be automatically closed.
You will need to open a new session with your new password.
From a windows computer:
In mobaXterm:
- Click the session button, then click SSH.
- In the remote host text box, type: bioinfo-master.ird.fr
- Check the specify username box and enter your user name
- In the console, enter the password when prompted. Once you are successfully logged in, you will be use this console for the rest of the lecture.
From a mac or a linux computer:
Open the terminal application and type the following command:
ssh login@bioinfo-master.ird.fr
with login: your cluster account
How to : Reserve one or several cores of a node in interactive mode
The cluster uses the scheduler Slurm (https://slurm.schedmd.com/documentation.html) to manage and prioritize the use jobs.
It checks the ressources availables (CPU and RAM ) and allocate them to the users to perform their analyses.
When you are connected on bioinfo-master.ird.fr, you have the possibily to reserve one or serveral cores among them of the 27 nodes available.
Reserving one core
type the following command:
srun -p short --pty bash -i
You will be randomly connected to one of the nodes of the short partition and one core will be reserved for you.
Reserving several cores at the same time
type the following command:
srun -p short -c X --pty bash -i
With X the number of cores chosen between 2 to 12
You will be randomly connected to one of the nodes of the short partition and X cores will be reserved for you.
Reserving on core of a specific node:
type the following command:
srun -p short --nodelist=nodeX --pty bash -i
With nodeX belonging to the short parttion
How to : Transfer my data from the nas server to nodes
On the cluster, every node has its own local partition called /scratch.
/scratch is used to receive data to analyse, perform analyses on them and produces data results temporarly.
It is mandatory to transfer your data to the node partition /scratch before launching any analyses.
/scratch volume can be from 1Tb up to 5To depending on the chosen node.
Data from /scratch are temporary, they can be erases after 3 weeks without use.
When your analyses are done, you can then retrieve your data.
Please pay attention to the following section to determine which nas server you want to use.
the scp command:
To transfer data, we can use the scp command:
scp -r source destination
Retrieve files from on a remote server:
scp -r remote_server_name:path_to_files/file local_destination
Copy files to a remote server:
scp -r /local_path_to_files/file remote_server_name:remote_destination
Transfer to or from /home, /data2 or /teams:
Partitions /home, /data2 and /teams are located on bioinfo-nas.ird.fr (nas)
Retrieve files from nas :
syntaxes to use:
scp -r nas:/home/login/file local_destination
scp -r nas:/data2/project/project_name/file local_destination
scp -r nas:/teams/team_name/file local_destination
Copy files to nas:
syntaxes to use:
scp -r /local_path_to_files/file nas:/home/login
scp -r /local_path_to_files/file nas:/data2/project/project_name
scp -r /local_path_to_files/file nas:/teams/team_name
Transfer to or from /data :
Partition /data are located on bioinfo-nas2.ird.fr (nas2)
Retrieve files from nas2 :
syntaxe to use:
scp -r nas2:/data/project/project_name/file local_destination
Copy files to nas2:
syntaxe to use:
scp -r /local_path_to_files/file nas2:/data/project/project_name
Transfer to or from /data3 :
Partition /data3 are located on bioinfo-nas3.ird.fr (nas3)
Retrieve files from nas3 :
syntaxe to use:
scp -r nas3:/data3/project/project_name/file local_destination
Copy files to nas3:
syntaxe to use:
scp -r /local_path_to_files/file nas3:/data3/project/project_name
How to : Use the module Environnement
Module Environment allows you to dynamically change your environment variable(PATH, LD_LIBRARY_PATH) and then choose your version software.
The nomenclature use for modules is
Display the available softwares
module avail
Display the description of a particular software
module whatis module_type/module_name/version
with module_type: bioinfo or system with module_name: the name of the module.
For example : for the version 1.7 of the bioinformatic software samtools:
module whatis bioinfo/samtools/1.7
Load a particular software version
module load module_type/module_name/version
with module_type: bioinfo or system with module_name: the name of the module.
For example : for the version 1.7 of the bioinformatic software samtools:
module load bioinfo/samtools/1.7
Unload a particular software version
module unload module_type/module_name/version
with module_type: bioinfo or system with module_name: the name of the module.
For example : for the version 1.7 of the bioinformatic software samtools:
module unload bioinfo/samtools/1.7
Display all the modules loaded
module list
unload all the modules loaded
module unload
How to : Launch a job with Slurm
The cluster uses the scheduler Slurm to manage and prioritize the use jobs.
It checks the ressources availables (CPU and RAM ) and allocate them to the users to perform their analyses.
When you are connected on bioinfo-master.ird.fr, You can lauch a command or a script using the command sbatch.
It allows you to launch your analyses in background process on the cluster.
Then you can kill your ssh session and retrieve your analyses results later.
Use srun with a command:
If you simply want to launch a command that will be executed on a node:
srun -p partition command &
With command the command to launch and partitionthe chosen partition
For example
srun -p short hostname &
will launch the command hostname on the node choose by Slurm.
The result of the command will be stored into a file in your personal home with the following syntax:
Use sbatch to launch a script:
You can directly launch a script with several commands to launch into the chosen node.
Set Slurm parameters into the script
The beginning of the script should contain the parameters to provides to SGE.
All the parameters should be written with the syntax #SBATCH before.
Here are the main parameters to add at the begininig of the script:
#!/bin/bash
## Define the job name
#SBATCH --job-name=test
## Define the output file
#SBATCH --output=res.txt
## Define the number of tasks
#SBATCH --ntasks=1
## Define the execution time limit
#SBATCH --time=10:00
## Define 100Mo of memory per cpu
#SBATCH --mem-per-cpu=100
You can find more options on the Slurm options here: Slurm options
examples of shell scripts for slurm :
Command to launch a job via sbatch:
sbatch script.sh
With script.sh the shell script to launch.
How to: Choose a particular partition
Depending on the type of jobs you want to launch you have the choice between several partitions.
The partitions can be considered job queues, each of which has an assortment of constraints such as job size limit, job time limit, users permitted to use it, etc.
Priority-ordered jobs are allocated nodes within a partition until the resources (nodes, processors, memory, etc.) within that partition are exhausted.
Here are the available partitions:
| partition | role | nodes list | Number of Cores | Ram on nodes |
|---|---|---|---|---|
| short | Short Jobs < 1 day (higher priority,interactive jobs) | node0,node1,node2,node13,node14 | 12 cores | 48 to 64 GB |
| normal | job of maximum 7 days | node0,node1,node2,node5,node13,node14,node15,node16,node17,node18,node19,node20,node22,node23,node24 | 12 to 24 cores | 64 to 96GB |
| long | <7 days< long jobs< 45 days | node3,node8,node9,node10,node11,node12 | 12 to 24 cores | 48 GB |
| highmem | jobs with more memory needs | node4, node7,node17,node21 | 12 to 24 cores | 144 GB |
| supermem | jobs with much more memory needs | node25 | 40 cores | 1 TB |
| gpu | Need of analyses on GPU cores | node26 | 24 cpus and 8 GPUS cores | 192 GB |
Note that the gpu node access is restricted, a request access should be done here: request access to gpu
Use your ldap account with your mil password to connect
Choose the convenient queue according to this scheme:

By default, when you don’t specifify a particular partition the normal is used
Pay attention, highmem has to be used for jobs that need at least 35-40GB of memory.
supermem partition has to be used for bulky assembling and jobs that needs more than 100Gb of memory
You can also use the htop command on a node to visualize the amount of memory used for a process.
To choose a particular parttion, use the -p option.
sbatch -p partition
srun -p partition
With partition the chosen partition.
How to : ask for a software, an account or a project space
- Go to requests
- Use you IRD lpad login and your IRD mail password
On this page, you have access to serveral forms regarding accounts, software,projects or galaxy.
Here are the main forms:
Ask for a software:
- Go to software
- Use you IRD lpad login and your IRD mail password
Ask for an account:
- Go to account
- Use you IRD lpad login and your IRD mail password
Ask for a projet space:
- Go to project
- Use you IRD lpad login and your IRD mail password
Ask for a galaxy account:
- Go to galaxy
- Use you IRD lpad login and your IRD mail password
How to : see or delete your data contained in the /scratch partition of the nodes
Both scripts are contained in /opt/scripts/scratch-scripts/
-
To see your data contained in the /scratch partition of the nodes: launch the following command:
sh /opt/scripts/scratch-scripts/scratch_use.shand follow the instructions
-
To delete your data contained in the /scratch partition of the nodes: launch the following command:
sh /opt/scripts/scratch-scripts/clean_scratch.shand follow the instructions
How to : Use a singularity container
Singularity enables users to have full control of their environment. Singularity containers can be used to package entire scientific workflows, software and libraries, and even data. This means that you don’t have to ask your cluster admin to install anything for you - you can put it in a Singularity container and run.
Singularity is installed on the Itrop Cluster in two versions 2.4 and 3.3.0.
The containers are located into /data3/projects/containers
The 2.4 folder hosts the containers built with the 2.4 version of singularity
The 3.3.0 folder hosts the containers built with the 3.3.0 version of singularity
You first need to load the environment with the command:
module load system/singularity/2.4 or module load system/singularity/3.3.0
Get help:
You have the possibility to get help on every container made on the cluster using the following command
singularity help /data3/projects/containers/singularity_version/container.simg
with container.simg the name of the container you want to use.
with singularity_version: 2.4 or 3.3.0
Shell connection to a container:
singularity shell /data3/projects/containers/singularity_version/container.simg
Launch a container with only one application:
singularity run /data3/projects/containers/singularity_version/container.simg + arguments
Launch a container with serveral applications:
singularity exec /data3/projects/containers/singularity_version/container.simg + tools + arguments
Bind a host folder to a singularity container.
We use the option --bind /host_partition:/container_partition
Example:
singularity exec --bind /toto2:/tmp /data3/projects/containers/singularity_version/container.simg + tools + arguments
The container will have access to the file of the partition /toto2 of the host in its /tmp partition
By default, partitions /home, /opt,/scratch, /data, /data2 and /data3 are already binded.
How to : Cite the Itrop platform in your publications
Please just copy the following sentence:
The authors acknowledge the IRD itrop HPC (South Green Platform) at IRD montpellier for providing HPC  resources that have contributed to the research results reported within this paper.
    URL: https://bioinfo.ird.fr/- http://www.southgreen.fr
Links
- Related courses : Linux for Dummies
- Related courses : HPC
- Tutorials : Linux Command-Line Cheat Sheet
License

